The most common advice for a misbehaving trailer water pump is also the most wasteful. Replace the pump. A pump that cycles at night, pulses at a faucet, or will not shut off is treated as worn out, swapped for a larger unit, and then the new pump does exactly the same thing. That's because the fault usually sits elsewhere, in a leaking toilet valve, debris in a check valve, air entering the suction line, or a strainer packed with sand.
A bigger pump doesn't fix those problems. It cycles faster, drains the battery harder, and loses more water through the same leak. Facility managers who run mobile offices, classrooms, clinics, and jobsite trailers get better results from a different sequence. Size the pump to the fixtures, install and prime it once, correctly, diagnose in a fixed order before replacing anything, and treat every restart after storage as a sanitation task, not just a mechanical one.
Table of Contents
- Pump Ratings and Flow Rates That Matter
- Matching a Pump to Your Trailer's Use
- How to Install and Prime the Pump
- Diagnosing Pump Faults in the Right Order
- Winterizing and Restarting a Stored Trailer Pump
- Confirm Your Pump Spec Before You Buy or Install
Pump Ratings and Flow Rates That Matter
| Pump class | Typical flow | Typical pressure | Intended use |
|---|---|---|---|
| Compact 12 V RV demand pump | 2.9 GPM | up to 50 psi | Handwashing and kitchenette service |
| Widely used RV demand class | 3 GPM | 55 psi | Baseline for handwashing and one low-flow shower |
| Domestic lower-flow configuration | 3.3 GPM | 45 psi | Light fixture use in small trailers |
| Larger domestic RV-style pump | 5 GPM | 60 psi | Larger motorhomes and multiple fixtures |
| Bulk transfer, 550-gallon water trailer | 106 GPM at 230 ft head | Rated by head, not fixture psi | Filling tanks and site water delivery |
Two numbers define every trailer water pump, and they answer different questions. GPM, gallons per minute, is flow, the volume delivered over time. Psi, pounds per square inch, is the pressure held in the plumbing at the fixtures. A pump can post a strong flow number and still feel weak at a showerhead if that flow was measured with no pressure behind it.
Domestic Pumps Pressurize Plumbing
Domestic RV-style pumps commonly operate around 3 to 5 GPM and 45 to 60 psi, with a 5 GPM, 60 psi pump marketed for larger motorhomes and a 3.3 GPM, 45 psi model representing a lower-flow configuration, according to the Seaflo pump listing on etrailer. These are demand pumps. A pressure switch starts the motor when line pressure falls and stops it at a preset shutoff pressure, so water moves only when someone opens a fixture.
The rating on the box needs one correction before it means anything. Free-flow output is measured with an open outlet, no restriction, no showerhead, and no long pipe run. Delivered flow at operating pressure is lower, and it drops further with elevation, small pipe diameter, and several fixtures open at once. A buyer comparing two pumps should compare flow at the same working pressure, not the larger free-flow headline.
Transfer Pumps Move Volume
Bulk transfer is a separate job with separate hardware. The Multiquip WT5HP-Series specification lists a 550-gallon water trailer that fills completely in 5.3 minutes using a pump rated at 106 GPM at 230 feet of head. Read that carefully. The 230 figure is head in feet, a measure of lift, not flow and not psi. Confusing head with GPM is how a transfer pump ends up specified for a restroom trailer.
That 106 GPM is roughly 35 times the flow of a typical 3 GPM RV pressure pump. Put the same tank behind both pumps and the difference becomes practical. At a continuous 3 GPM, a 550-gallon tank supports about 183 minutes of pumping. A transfer pump empties it in minutes because it was built to fill tanks, suppress dust, and wash down equipment, not to hold steady, quiet pressure at a sink. Anyone evaluating a mobile watering tank setup for site work should start from that distinction, not from tank size alone.
Selection rule: Match the table row to the trailer's job first, then confirm flow at operating pressure and shutoff pressure. Price comes last.
A domestic pump on a transfer job will run for hours and deliver a trickle. A transfer pump on domestic plumbing delivers volume with no demand control, hammers fittings, and gives occupants pressure that surges instead of holding steady. Neither failure is a quality problem. Both are class errors, and they're avoidable at the specification stage for the cost of reading two numbers correctly.
Matching a Pump to Your Trailer's Use
Start with the baseline. Recreational-vehicle trailer water pumps are generally compact, 12-volt demand pumps designed to draw water from a fresh-water holding tank and pressurize the plumbing when a faucet or shower is opened, and a representative modern RV pump is rated at 2.9 GPM and up to 50 psi, while another widely used class is rated at 3 GPM and 55 psi, per the Flojet RV water pump listing from Kleen-Rite. For a trailer used as temporary workspace, that roughly 3 GPM class covers handwashing, a kitchenette, and one low-flow shower. It's built for intermittent fixture use, not continuous high-volume delivery.
A Five Point Sizing Checklist
- Count simultaneous fixtures: List every fixture that can run at the same time, not every fixture installed. Two sinks and a shower that never overlap is a different load than all three open together during a break period.
- Estimate daily occupancy: A classroom trailer serving a full class of students draws water in sharp bursts between periods, while a jobsite office with a small crew spreads use across the day. Occupancy sets how often those bursts collide.
- Measure the run to the farthest fixture: Long hose and pipe runs add friction and drop delivered flow. The farthest sink is the honest test of a pump's capacity, not the one beside the tank.
- Confirm the supply source: Note tank size and whether the trailer runs from its holding tank or a city connection. A pump sized for tank duty may be redundant, or masked, on city pressure.
- Identify any continuous load: A booster feeding a restroom, a fill line, or any load that runs without pause changes the duty cycle. Demand pumps are intermittent machines, and continuous duty shortens their life.
Larger occupancy or several fixtures running together may call for a higher-capacity system, an accumulator tank, or a separate booster arrangement. An accumulator smooths delivery and reduces short cycling at low flow, which helps a single handwashing sink feel steady. A booster makes sense when one branch, such as a restroom at the far end of a mobile office trailer with bathroom, needs more than the main pump delivers over distance.
Specify the Standard, Not Just the Pump
NSF/ANSI 24-2020 specifically establishes minimum requirements for recreational-vehicle plumbing-system components, including pumps, tanks, connectors, fixtures, and appliances. Asking for compliance on the whole component list, not only the pump, gives the buyer a formal performance and materials framework to hold a supplier to. It also removes argument later about whether a connector or fitting was ever rated for potable service.
One final caution belongs in every sizing decision. Oversizing is a sizing error, not a repair. A pump one class too large for a tight, well-sealed system is harmless enough, but a pump bought oversized to overpower weak pressure caused by a restriction or leak spends more energy on the same fault. Size to the counted load, then fix plumbing problems as plumbing problems.
How to Install and Prime the Pump
A clean install prevents most of the faults covered later in any service log. The sequence below follows the order a technician works, tank to fixture, with the common slip flagged at each step.
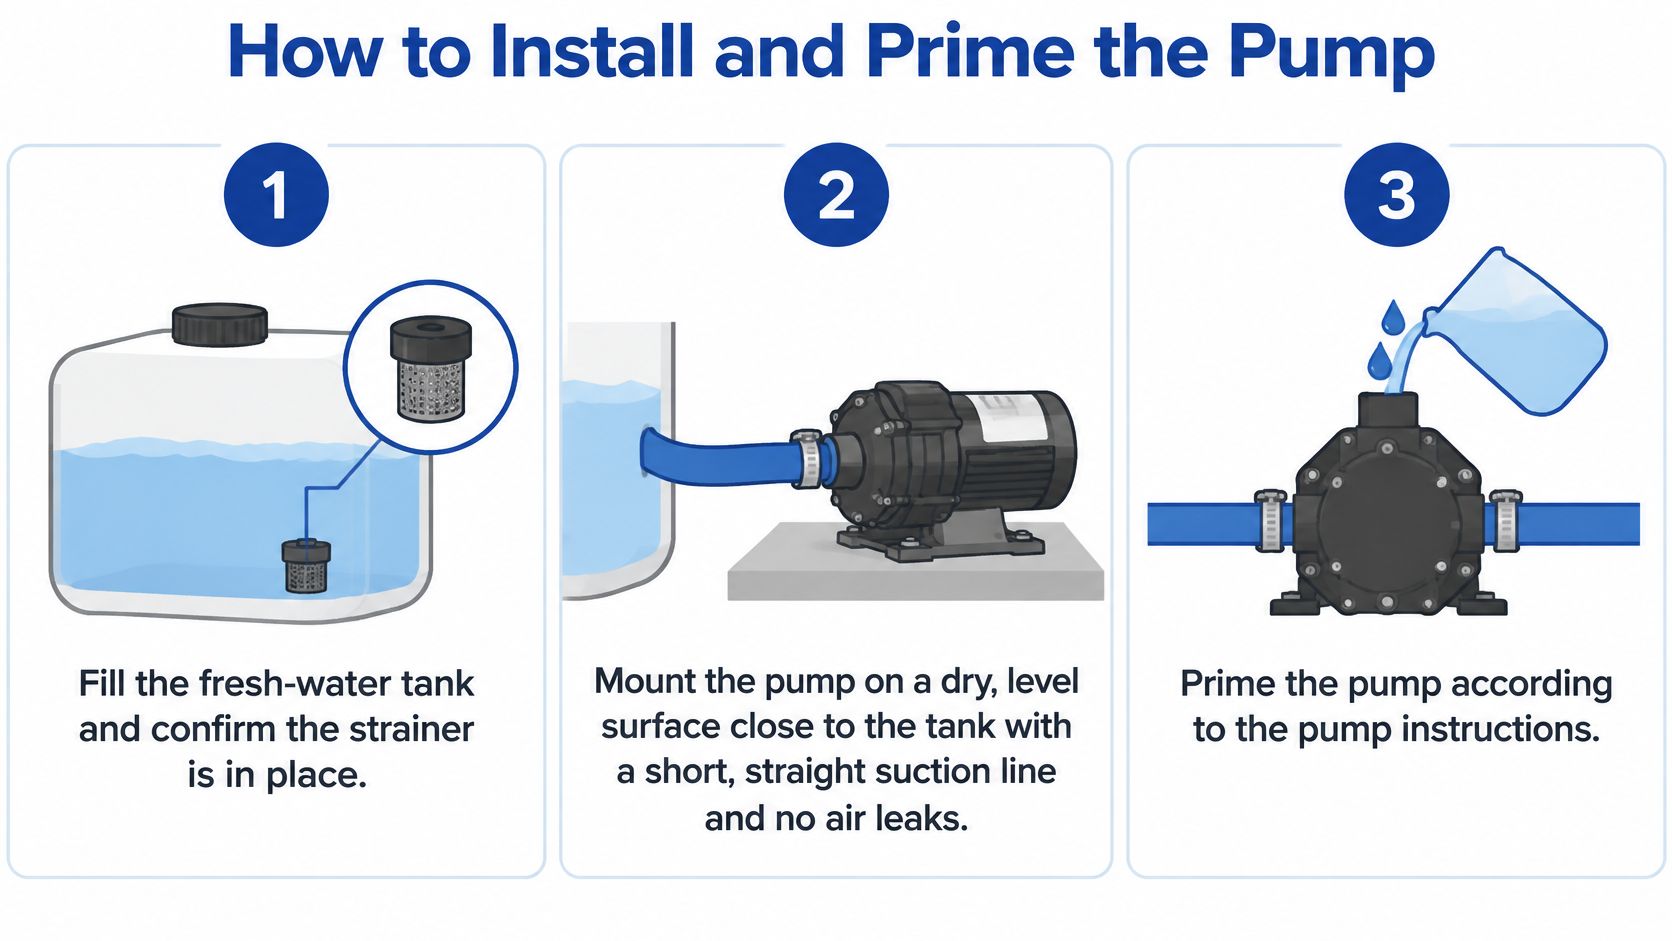
The three opening moves, fill, mount, and seal the suction side, are summarized in the process graphic here.
The Installation Sequence
- Fill the tank and fit the strainer: Fill the fresh-water tank and confirm the inlet strainer is in place. The strainer is cheap insurance against the sand and plastic debris that later jam check valves, and skipping it during a hurried install is a frequent oversight.
- Mount close to the tank: Mount the pump on a dry, level surface close to the tank, with a short, straight suction line and no kinks. Every extra foot and bend on the suction side makes priming harder and invites air leaks at stressed fittings.
- Seal the suction side: Inspect the inlet hose, clamps, and O-ring for air leakage before power is connected. Suction-side leaks pull in air rather than dripping water, so they stay invisible until the pump refuses to prime.
- Connect and verify power: Connect the 12-volt supply through a fuse and confirm voltage at the pump itself, not only at the battery. Corroded terminals and undersized wire pass a casual glance and fail under load.
- Prime from nearest to farthest: Open the faucet nearest the pump, run the pump until sputtering stops, then repeat at the farthest hot and cold fixtures, following the three-stage method in the Flojet RV water pump user guide from Xylem. The most common mistake happens here. A no-prime condition gets treated as an electrical failure when the actual cause is a low tank, a blocked strainer, a kinked suction line, or a suction-side air leak, all of which stop priming with full voltage present.
- Confirm shutoff: Close the fixtures and confirm the pump stops once downstream pressure is restored. A pump that keeps running after shutoff pressure should be reached is announcing a leak or an air problem on day one.
- Accept the install: Run a dry paper towel over every accessible fitting, verify steady flow at several fixtures, and confirm there's no cycling with all fixtures closed. Dry paper shows seepage that a hand misses on already damp plumbing.
Reading about priming only goes so far, and watching the sputter-to-steady transition once makes the symptom unmistakable in the field.
Two Warnings Before Sign Off
Don't run the pump dry while chasing a prime. Operating dry can damage internal components and may leave the pump running continuously afterward. If water hasn't reached the pump after a short run, stop and fix the suction side instead of letting the motor grind through the problem.
Record the acceptance results with the trailer's file, including measured voltage, strainer condition, and whether the pump held pressure with fixtures closed. That record becomes the baseline every future diagnosis is measured against. Most RV-style pumps are commonly rated around 3.5 GPM, but the relevant benchmark is the manufacturer's specified flow at the system's operating pressure, not the free-flow rating, so verify that figure before accepting the pump.
Diagnosing Pump Faults in the Right Order
Three symptoms cover nearly every trailer water pump complaint, and each points somewhere different. The pump runs continuously. The pump cycles with all fixtures closed. Pressure drops only at peak simultaneous demand. Naming which case is present, before touching a tool, prevents the most expensive error in pump service, replacing a healthy pump connected to a leaking system.
| Symptom | First check | Fix |
|---|---|---|
| Pump will not prime | Tank level, strainer, suction-line kinks and air leaks at fittings | Refill tank, clean strainer, re-seat clamps and O-rings, confirm voltage |
| Pump runs continuously | Open the faucet nearest the pump and look for drips at dry fittings | Repair the downstream leak; if the pump still runs, isolate the discharge |
| Cycles with all fixtures closed | Toilet valve, water-heater bypass, low-point drains and faucet cartridges | Repair the leak, clean check-valve debris, then reassess before replacing the pump |
| Pressure drops only at peak demand | Suction restriction, priming and number of fixtures open at once | Clear suction restriction; add an accumulator or capacity only after leaks are fixed |
| Sputtering at fixtures | Air in the suction line | Re-prime and tighten inlet fittings |
| Cycling only when city water is connected | City pressure forcing water back through a failed check valve | Disconnect city water and retest |
The Isolation Sequence
Frequent cycling with all fixtures closed commonly indicates a leak somewhere in the pump connections, filters, valves, toilet, or piping. The pump is doing its job, restoring pressure that keeps escaping. An accumulator tank lengthens the interval between cycles, which makes the symptom quieter, but it cannot repair the leak, and fitting one to silence cycling is how a small seep becomes floor damage.
Work the sequence in order, as set out in the Black Series guide to RV water pump check valves. First, turn off city water and close all faucets, including the outside shower, which is the fixture most often forgotten. Second, inspect the toilet valve, water-heater bypass, low-point drains, faucet cartridges, and visible fittings for seepage. Third, clean the inlet strainer and inspect it for sand or plastic debris. Fourth, if cycling continues, cap or isolate the pump discharge temporarily to distinguish a downstream leak from an internal check-valve or pressure-switch fault.
That last step settles the argument. If the pump holds pressure with its discharge capped, the leak is downstream and the pump stays. If it still cycles against a cap, the fault is internal, and debris in the check valve is a frequent, correctable cause worth cleaning before any replacement is quoted. Technicians who want a second walkthrough of pump internals before opening one up will find the RV pump repair tips from Motor Sportsland a useful companion to this sequence.
The City Water Trap
City water can mask a failed check valve or force water backward through the pump, so testing must be performed with the city-water connection disconnected.
This single pitfall corrupts more diagnoses than any other. A trailer tested on city pressure appears to have strong flow and a quiet pump, because the municipal supply is doing the work and hiding the fault. Disconnect, then test. Every conclusion drawn while connected is suspect.
Pressure fluctuation during use has its own short list. Suction-line restriction, a kinked hose, air entering through loose fittings, or an inadequately primed pump all produce pulsing that looks like pump wear. None of them is cured by a higher-capacity pump, which typically worsens cycling, battery consumption, and water loss while the underlying leak or air-ingress problem remains.
Record each service call properly. Note the initial symptom, measured voltage, inlet condition, strainer debris, pressure-hold time, and post-repair cycling frequency. Maintenance guidance identifies inadequate sanitizing and winterization as the leading contributors to pump trouble, so the log often reveals that repeat faults follow storage, not mileage. Replace the pump only after the leak and debris checks pass. At that point replacement is a conclusion, not a guess.
Winterizing and Restarting a Stored Trailer Pump
Conventional winterizing advice tells owners to drain the tank, open faucets, disconnect pump lines, or circulate antifreeze. It rarely explains how to verify that a trailer is safe to return to service afterward. That gap is minor for a recreational owner and serious for a school, clinic, government office, or construction crew, where a trailer may sit unused for a season and then be needed immediately, with occupants drinking from the system the same morning.
Draining Is Not Sanitizing
The Hood River County mobile unit water system handout requires tanks, pumps, and hoses to be flushed and sanitized after construction, repair, modification, or periods of nonuse, not merely drained. Regulations for mobile and travel-trailer settings also require an adequate, safe potable supply. Together, those rules reframe the restart. It's a health and operations task with a mechanical component, not a repair task with optional cleaning attached.
Distinguish potable-water trailers from ordinary RV systems before winterizing. Use only approved potable-system antifreeze where antifreeze is appropriate, and don't let antifreeze enter the water heater unless the manufacturer allows it. Bypass the heater, protect the pump and low points, and tag the unit with the date and method used so the restart crew isn't guessing what is sitting in the lines.
The Restart Checklist
- Inspect fittings: Check every accessible connection for freeze damage, cracked housings, and weeping seals before pressurizing the system.
- Replace damaged filters: Swap out filters and strainers that sat wet, froze, or show discoloration, since a stored filter can seed the system it's meant to protect.
- Flush to clear water: Flush until odor and color disappear at every fixture, nearest and farthest, hot and cold.
- Sanitize tank and lines: Sanitize the full system, tank, pump, and distribution lines, then flush again so no sanitizer taste remains.
- Confirm prime and shutoff: Verify the pump primes, delivers steady flow, and shuts off without cycling once fixtures close.
- Document responsibility: Record who owns water quality for the unit, the restart date, and the method used, and file it with the trailer.
Consider a modular classroom that sat through summer break. The pump may start instantly in August and appear ready, while the tank and lines have held warm, stagnant water for weeks. A documented flush and sanitize before students return costs an hour. Skipping it because the pump sounds healthy confuses a mechanical pass with a potable-water pass, and those are different standards.
A restart is documented, not assumed. If there's no record of flushing and sanitizing after nonuse, the unit isn't back in service yet.
Keep a log of each storage period and restart for every unit in the fleet. Dates, antifreeze method, sanitation steps, and the name responsible turn a seasonal chore into an auditable control, which is exactly what institutional operators need when a health inspector or a parent asks how the water was verified.
Confirm Your Pump Spec Before You Buy or Install
A trailer water pump purchase goes wrong at the paperwork stage more often than at the install. Run this checklist before signing anything, and get the answers in writing.
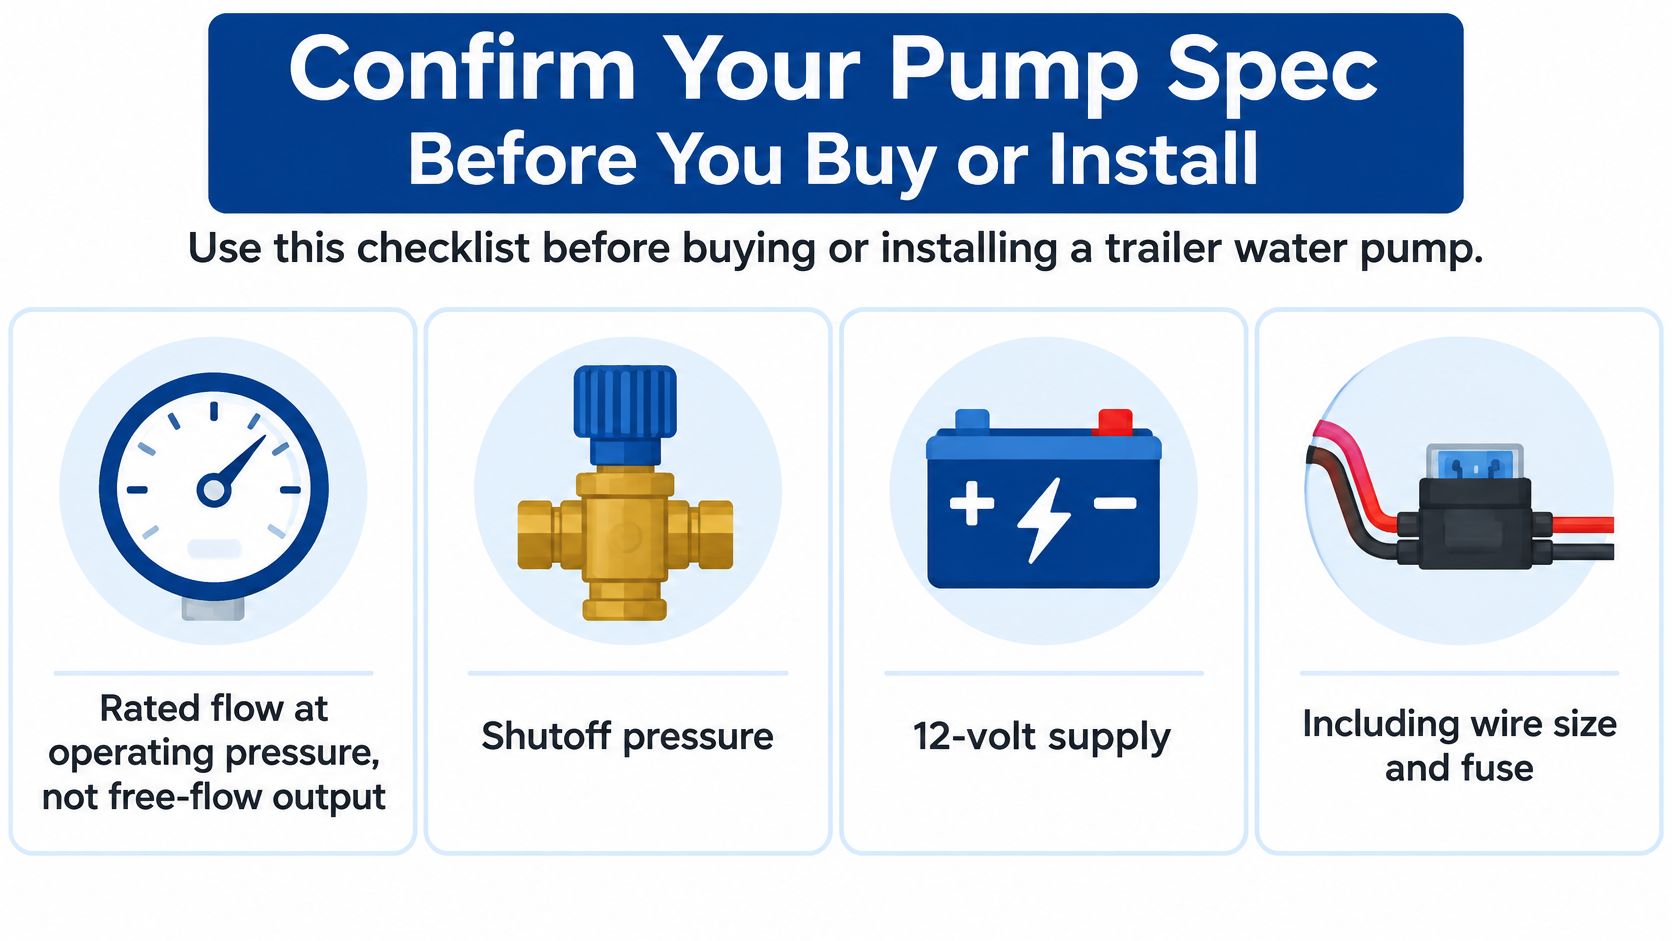
- Rated flow at operating pressure: Confirm the flow figure at working pressure, not free-flow output, and match it against the counted simultaneous fixtures and the pump class in the rating table.
- Shutoff pressure and supply: Confirm the shutoff pressure and the 12-volt supply, including wire size, fuse, and measured voltage at the pump.
- Standards compliance: Confirm NSF/ANSI 24-2020 compliance for pumps, tanks, connectors, and fixtures across the whole system.
- Sanitation and restart plan: Require a written plan covering flushing, sanitizing, and named responsibility for water quality after any period of nonuse.
- First 30 days log: Keep a log recording symptoms, voltage, strainer condition, and cycling frequency, so early faults are diagnosed from evidence.
Ask the supplier, before signing, for the pump model, its rated flow at operating pressure, and the sanitation record for the unit. Pacific Mobile Structures, Inc. offers mobile office trailers in a wide selection of sizes and floorplans, delivers leased units on time and to the customer's specifications, and its rented buildings are freshly reconditioned, well-maintained, and pass a multi-point inspection before delivery. Send the trailer's occupancy, fixture count, and location so the pump specification can be confirmed against the actual unit rather than a generic listing.
Pacific Mobile Structures, Inc. provides mobile offices, modular classrooms, and relocatable buildings for education, healthcare, government, and construction teams that need dependable space without delay. For a trailer specified with the right water system for its occupancy and fixtures, and inspected before delivery, visit Pacific Mobile Structures, Inc. to review available floorplans and start a specification conversation.