
A modular classroom is being craned onto its foundation pads, the entry ramp is already laid out, and the design team is debating whether an exterior stair is still necessary. That question appears on schools, clinics, offices, and government projects because an accessible route and a stairway serve different functions. A ramp may provide the required barrier-free entry, but it doesn't eliminate the need to design other stairs correctly.
The problem usually surfaces late. A shop drawing shows a landing that won't fit the corridor, a handrail extension conflicts with a guard, or field measurements reveal that one riser differs from the others. In modular construction, those discoveries can mean factory rework, revised submittals, a second inspection, and delayed occupancy. ADA compliant stairs must be coordinated before fabrication, not improvised after the building arrives.
Table of Contents
- Why ADA Stairs Still Matter on a Modular Job Site
- How the ADA Framework Treats Stairs and Accessible Routes
- Riser, Tread, and Nosing Requirements Explained
- Handrail Geometry and Continuity Essentials
- Stairs, Ramps, Lifts, and the Accessible Route Decision
- Inspection, Documentation, and Common Compliance Failures
- Integrating ADA Stairs with Modular Building Delivery
Why ADA Stairs Still Matter on a Modular Job Site
The design meeting often starts with a practical question: does the building need an exterior stair if the accessible entrance already has a ramp? On a single-level module, the answer may depend on the site arrangement and means of egress. On a two-story modular building, raised classroom platform, or mezzanine, stairs remain a central part of circulation even when a ramp, lift, or elevator serves the accessible route.
Stairs aren't a substitute for accessibility. They are a parallel building element that supports staff, visitors, maintenance personnel, and occupants who use stairs during ordinary circulation or emergency egress. Their geometry, handrails, landings, and surface conditions still require deliberate design, particularly where the stair is part of a required means of egress.
Practical rule: Treat the stair, landing, accessible route, and adjacent guards as one coordinated assembly. A compliant component can still fail when its neighbors consume the space needed for safe use.
The cost of a late stair decision
A modular stair is often detailed across several drawing packages. The architect coordinates the landing with the building envelope, the structural team confirms attachment points, the manufacturer sizes the stair assembly, and the site team prepares the supporting pads or slab. If one dimension changes after fabrication, the correction can affect all four parties.
Common consequences include:
- Rejected shop drawings: A reviewer may return a submittal when risers, treads, handrails, or landing transitions aren't clearly dimensioned.
- Factory rework: A stair pan or handrail assembly is harder to modify once finishes, guards, and transport restraints are installed.
- Set-day conflicts: A stair delivered with excessive projection or the wrong landing orientation may not align with the module or accessible approach.
- Occupancy delays: An unresolved stair punch item can remain open even when the interior of the modular building is ready for use.
The project team should also coordinate finish selection early. A resource such as stair flooring options North Atlanta can help teams compare surfaces and understand how appearance, durability, traction, and maintenance affect stair performance. Flooring decisions shouldn't be separated from nosing visibility or the inspection strategy.
A modular project needs a complete access picture
The building package should show where stairs connect to the surrounding site, where the accessible route travels, and how people move between levels. That information belongs in the same coordination conversation as the modular construction site office, especially when temporary offices or support buildings are positioned on raised foundations or linked by exterior access systems.
The most reliable sequence is straightforward. Establish the route and egress strategy, lock the stair geometry, coordinate handrails and landings, verify factory tolerances, then confirm the field installation against the approved drawings. That process turns stair compliance from a late inspection concern into a controlled delivery requirement.
How the ADA Framework Treats Stairs and Accessible Routes
The federal accessibility framework distinguishes between a stairway and an accessible route. The U.S. Department of Justice ADA Standards were first adopted on July 26, 1991, and later revised on September 15, 2010. The 2010 Standards remain the core federal reference for modern stair compliance in U.S. construction and renovation.
The distinction matters because stairs don't create a barrier-free connection by themselves. When stairs aren't the only connection between levels, an accessible route such as an elevator, ramp, or lift generally provides the compliant connection. The stair may still need to meet applicable requirements where it forms part of a required means of egress or is altered under the governing rules.
Read the framework as a coordination task
A project lead should separate the regulatory questions instead of treating “ADA stairs” as one isolated checklist.
- Identify the building obligations. Determine which accessibility requirements apply to the project, its users, its funding, and its jurisdiction. Public schools, clinics, government facilities, and commercial buildings may involve several overlapping code and approval processes.
- Map every level connection. Mark each stair, ramp, lift, elevator, and exterior approach on the plans. The accessible route must be continuous, while the stair must be reviewed for its own applicable geometry and handrail requirements.
- Classify each stair. A main public stair, service stair, exterior egress stair, and stair within a modular support structure may have different design contexts, but the team shouldn't assume that a less prominent stair can ignore uniformity or handrail requirements.
- Confirm local amendments. The federal standard is a foundation, not a replacement for the adopted building code, fire requirements, or accessibility provisions enforced by the authority having jurisdiction.
The Binks Balustrades accessible design guidance offers useful context for thinking about railings as part of the wider access design rather than as decorative edge protection. On a modular job, that same principle applies to stair pans, landings, guard interfaces, wall returns, and route transitions.
Why the distinction affects modular drawings
A design that shows a ramp at the entrance but omits the stair's egress role is incomplete. Conversely, a stair detail that appears compliant in isolation may interfere with the accessible route, landing circulation, or required clearances once the module is set.
The design team should identify the responsible reviewer for each question. The architect may control accessibility documentation, the structural engineer may control stair attachments, the manufacturer may control fabrication tolerances, and the AHJ may interpret local requirements. A successful submittal brings those decisions together before the stair leaves the factory.
Riser, Tread, and Nosing Requirements Explained
Stair geometry is where a modular drawing either becomes dependable or creates trouble. The 2010 ADA Standards for Accessible Design establish the central dimensional limits: risers must be at least 4 inches and no more than 7 inches, while treads must be at least 11 inches deep. The same flight must use uniform riser heights and uniform tread depths.
Those requirements control the user's gait. A person shouldn't have to adjust foot placement because one step is unexpectedly taller or shallower than the next. In a factory-built assembly, uniformity also gives the quality team something measurable to verify before shipping.
The numbers that belong on the submittal
| Element | ADA Requirement | Build Implication |
|---|---|---|
| Riser height | 4 inches minimum and 7 inches maximum | Detail the finished riser, not only the structural stair pan. Account for flooring, nosing, and other finish buildup. |
| Tread depth | 11 inches minimum | Dimension the finished walking surface and verify that nosing details don't reduce the usable tread. |
| Uniformity | Riser heights and tread depths must be uniform within each flight | Check the first, middle, and final steps during factory quality control and after site installation. |
| Open risers | Open risers aren't permitted | Use a solid riser condition where the stair falls under the applicable requirement, and coordinate closure with the structural and finish packages. |
| Leading-edge radius | The tread leading-edge radius can't exceed one-half inch | Select a nosing profile that remains visible, durable, and within the permitted edge geometry. |
The table should be read with the finished assembly in mind. A stair can meet the structural drawing and still fail after flooring, edge trim, or a replacement tread changes the final dimensions. The field team should measure from the completed walking surfaces, not assume that the shop dimension survived installation unchanged.
What commonly goes wrong
A frequent shop-ticket error is measuring the tread from the back of the pan instead of from the finished nosing relationship. Another is allowing a thicker floor finish at one landing or one step, creating a variation that wasn't present in the bare stair module. These mistakes are avoidable when the manufacturer receives the approved finish schedule before fabrication.
Nosing visibility deserves practical attention. A contrasting strip can help users identify the edge, but it must be installed consistently and shouldn't create a raised obstruction or slippery transition. Surfaces should remain stable and slip resistant under the conditions expected at the project, including wet exterior exposure where applicable.
A factory tolerance is only useful when the inspection measures the same finished condition that occupants will use.
The final check belongs both before shipment and after set. Record each riser and tread, inspect the nosing profile, verify that the risers are closed where required, and photograph the completed flight. That record gives the reviewer evidence instead of relying on an assumption that a prefabricated stair arrived unchanged.
Handrail Geometry and Continuity Essentials
Handrails often determine whether a modular stair passes its final inspection. The Access Board stairway guidance requires handrails on both sides of applicable stairs, continuous for the full length of each flight. The gripping surface must be 34 to 38 inches above the walking surface or stair nosings, measured consistently across the assembly.
At the top, the handrail must continue horizontally 12 inches beyond the first riser nosing. At the bottom, it must continue along the stair slope for at least one tread depth beyond the last riser nosing. Those extensions give users support before the climb begins and after it ends, but they also consume space in compact modular layouts.
Design the rail as part of the floor plan
A rail that looks acceptable in elevation may obstruct circulation in plan. The designer must coordinate the rail with wall returns, guard posts, landing edges, doors, and the clear stair path. Ends should return into a wall, post, floor, or another safe termination rather than projecting into a route.
The handrail profile should provide a continuous, graspable surface with smooth edges. Brackets, fasteners, and intermediate supports shouldn't create sharp projections or pinch points. The wall-side clearance must remain usable after finishes are applied, and the rail shouldn't be interrupted by a decorative post or a change in modular panel alignment.
A practical handrail review
| Requirement | ADA Specification | Modular Build Implication |
|---|---|---|
| Sides | Handrails are required on both sides of applicable stairs | Coordinate both rail lines before shipping, including the side near a wall or guard. |
| Height | 34 to 38 inches above the walking surface or nosings | Verify finished height after flooring and nosing installation. |
| Continuity | Continuous for the full length of each stair flight | Avoid breaks at intermediate supports, corners, or modular joints. |
| Top extension | 12 inches horizontally beyond the first riser nosing | Reserve landing space and coordinate the extension with guard posts and corridor movement. |
| Bottom extension | At least one tread depth beyond the last riser nosing, following the stair slope | Confirm that the extension doesn't collide with a landing edge, door, or adjacent rail. |
A wide stair may need additional coordination so the handrail arrangement doesn't reduce the usable path or create an awkward center obstruction. Tight corridors require the same attention. A handrail that is technically installed but forces users into a pinch point isn't a successful field outcome.
Teams evaluating exterior railing assemblies can use deck stair railing as a product and configuration reference, but the final selection must match the project drawings, adopted code, loading requirements, and accessibility review. Before turnover, photograph the rail height, both extensions, returns, supports, and attachment points. Inspectors often need to see the installed condition, not only the product data.
Stairs, Ramps, Lifts, and the Accessible Route Decision
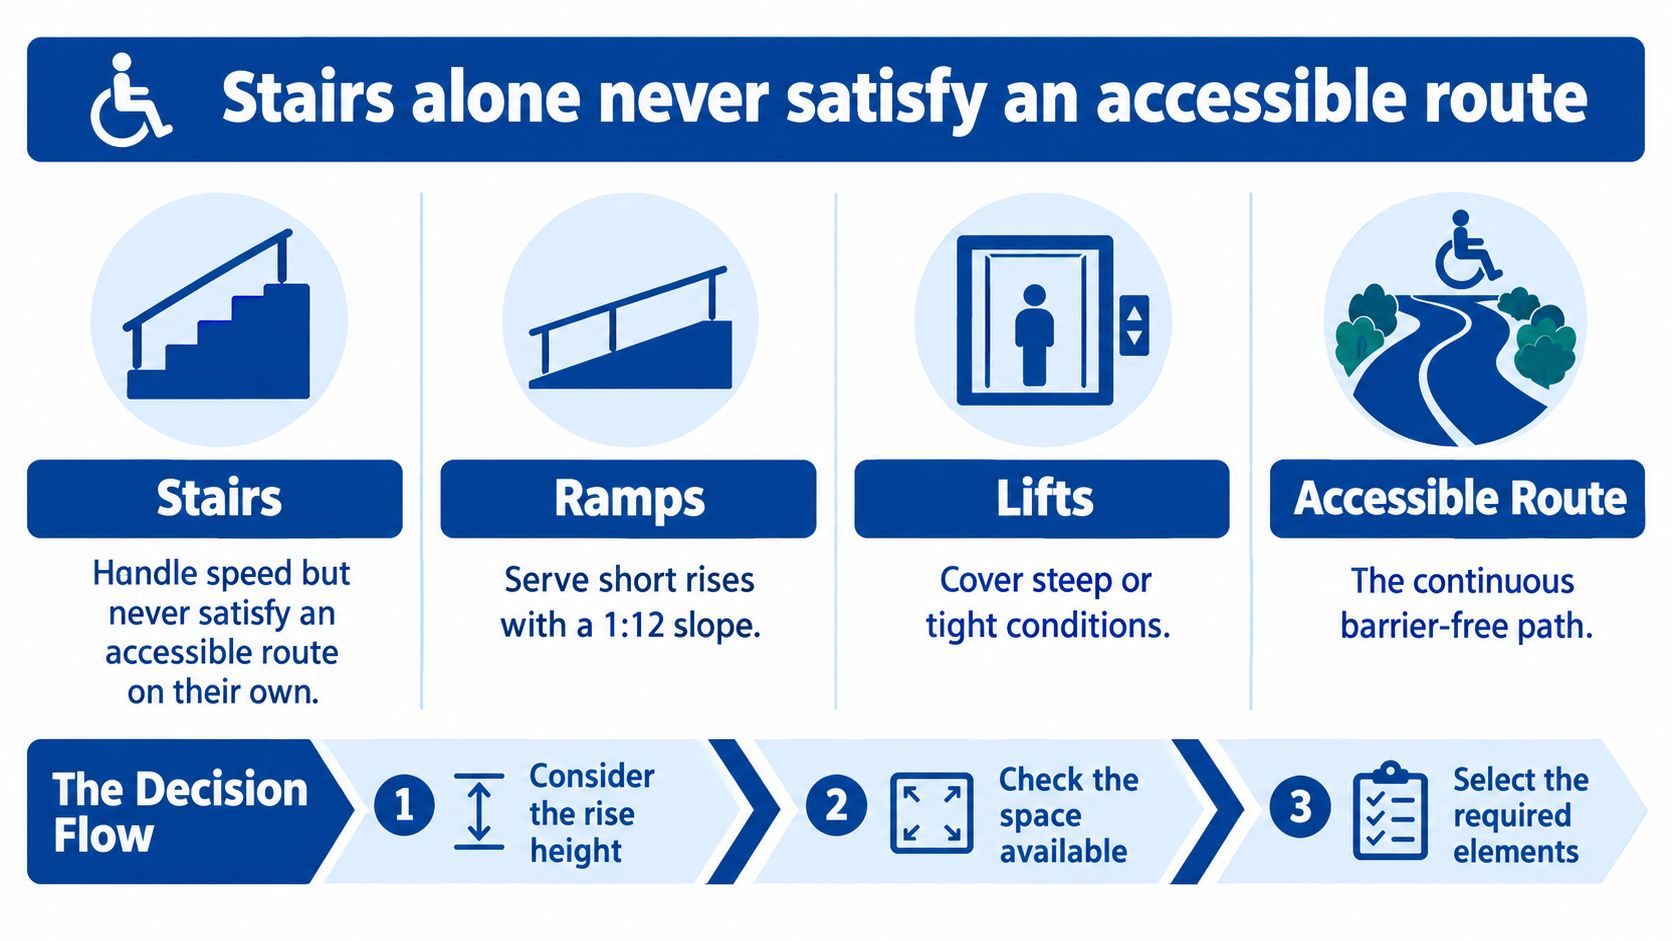
Stairs alone never satisfy an accessible route. That principle should be established while the modular building is still being configured, because floor elevations, platform heights, structural openings, and site approaches can make a late route change expensive.
Compare the options by project condition
Stairs provide fast movement for people who can use them and are usually straightforward to maintain. They don't provide a barrier-free route, so a separate accessible connection is needed where the building requires one.
Ramps provide a continuous walking surface for many users, but they require substantial horizontal space, level landings, drainage coordination, and careful integration with the site. A short change in elevation can become a long exterior approach once slope and landing requirements are applied.
Platform lifts can solve a constrained layout where a ramp or elevator isn't practical. They introduce equipment, power, weather protection, service access, and manufacturer coordination, including applicable lift standards and local inspection requirements.
Elevators offer the most complete vertical connection for multilevel public facilities, but they require a shaft, structural coordination, fire and life-safety integration, and an early decision about equipment and service access. A modular project can't treat the shaft as a late accessory because floor cassettes and ceiling assemblies establish its geometry.
Lock the strategy before fabrication
The accessible route decision should be made during schematic coordination, not after the module has been ordered. The project team should map the route from the site approach to the entrance and between occupied levels, then test each option against available space, foundation elevations, utilities, maintenance access, and emergency circulation.
The work-ready modular access solutions resource illustrates why stairs, ramps, platforms, and handrails are often planned as a coordinated access package. The exact system still requires project-specific review, but the delivery lesson is clear: selecting one element without checking the others creates conflicts at the entry.
A modular team should freeze shaft locations, landing footprints, and exterior connection points before factory fabrication begins. Stairs can remain part of the circulation plan, but the accessible route must have its own uninterrupted logic from the start.
Inspection, Documentation, and Common Compliance Failures
A reliable stair inspection begins before the module ships. Factory quality control should compare the approved shop drawings with the built stair, then the site team should repeat the inspection after foundation preparation, module set, exterior stair installation, and final finish work.
The turnover binder should show how the completed assembly was verified. It should contain:
- Approved geometry: Signed shop drawings identifying riser heights, tread depths, nosing profiles, and landing dimensions.
- Rail documentation: Handrail submittals, product data, attachment details, returns, and extension layouts.
- As-built measurements: Field records for finished risers, finished treads, handrail height, and landing transitions.
- Route verification: Documentation for adjacent ramps, lifts, or other accessible-route elements, including applicable field checks.
- Photographic evidence: Clear images of every nosing, extension, landing connection, return, and transition.
- Closeout tracking: A snag list showing each issue, responsible party, correction, and final confirmation.
Failures that create avoidable punch work
| Common Failure | ADA Reference | Typical Fix |
|---|---|---|
| Riser or tread outside the permitted range | Stair geometry requirements | Rebuild or adjust the affected assembly, then remeasure the complete flight. |
| Nonuniform risers or treads | Uniformity requirements | Correct the inconsistent step rather than accepting a visual patch. |
| Missing handrail extension | Handrail extension requirements | Rework the rail and confirm that the return and landing remain safe. |
| Interrupted handrail | Continuity requirements | Replace the interrupted section or revise the support and corner detail. |
| Open riser condition where prohibited | Stair construction requirements | Install the required riser closure and verify the finished dimensions. |
| Landing transition or route conflict | Accessible-route coordination | Correct the landing, approach, or adjacent route before final inspection. |
Inspectors also notice railings that have been installed too close to a wall, extensions that terminate in circulation space, nosings that project beyond the approved profile, and landings that don't align with the stair width. These defects often arise because a finish, guard, or site surface changed after the original stair review.
A measuring tape, a suitable level or inclinometer, and a photo log should remain with the stair inspection materials until the certificate of occupancy is signed. The habit is simple, but it prevents the team from relying on memory after several trades have modified the area.
Integrating ADA Stairs with Modular Building Delivery
Modular delivery makes stair compliance more predictable when each requirement is assigned to a milestone. It becomes risky when the team treats the stair as a loose accessory delivered after the building. The stair, landing, handrail, guard, and route interface should appear in the same asset record as the module they serve.
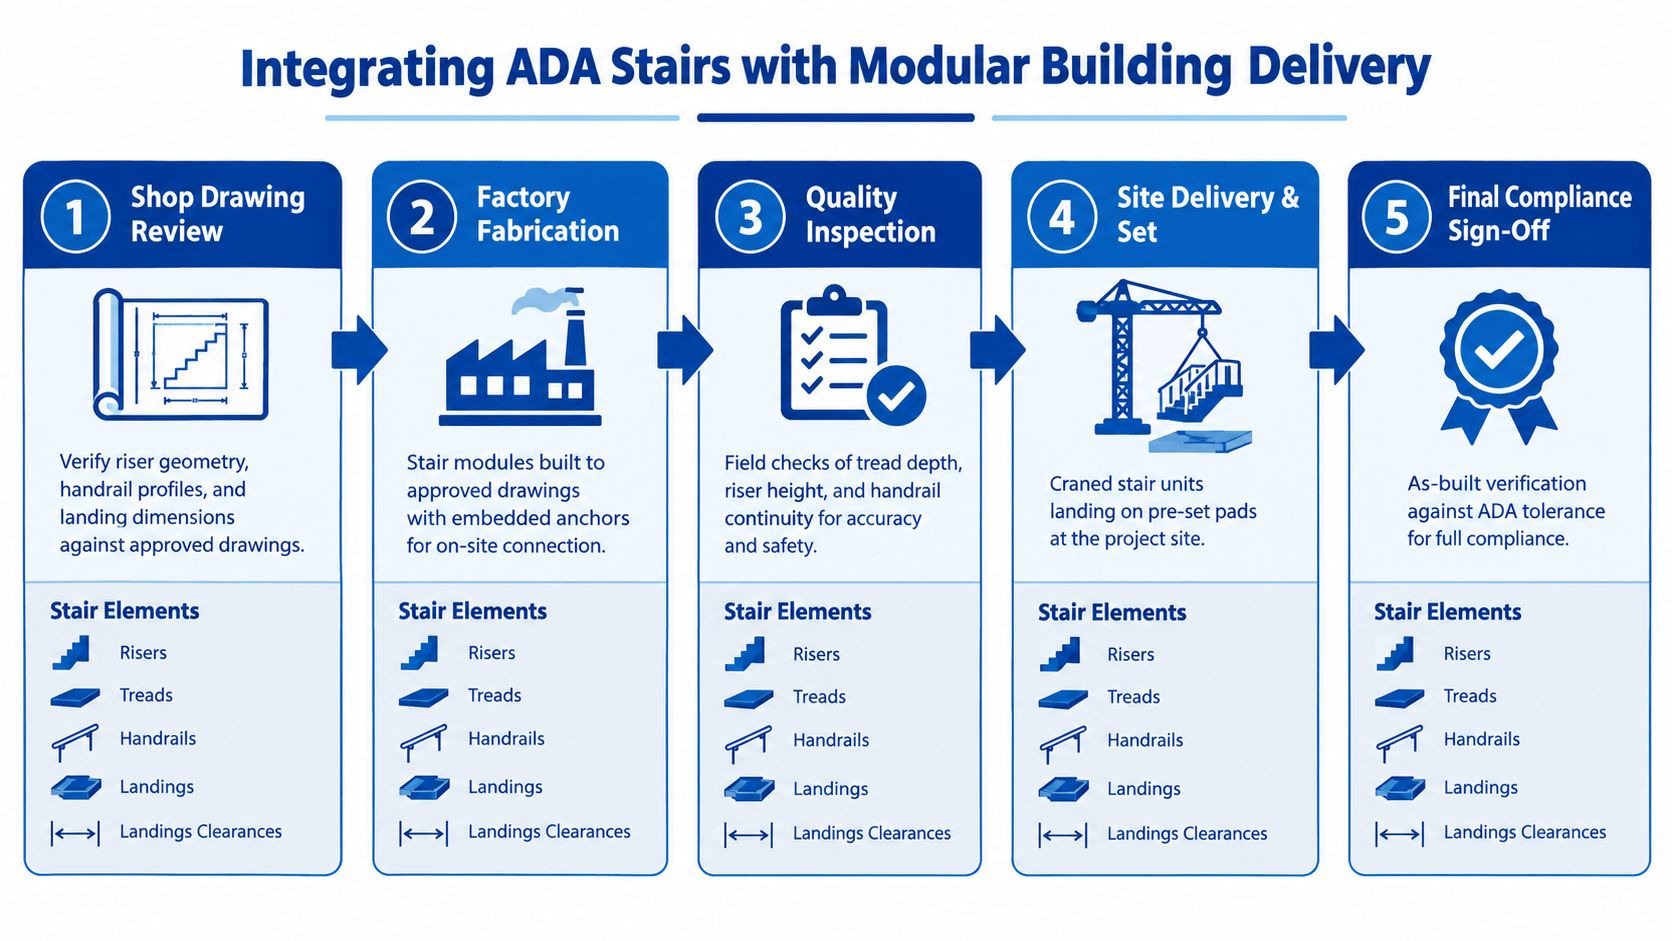
Five delivery controls
Shop drawing review locks the riser and tread geometry, handrail profiles, landing sizes, attachment points, and finish buildup before steel or aluminum is cut. The review should include plan, elevation, section, and connection information.
Factory fabrication converts the approved detail into a repeatable assembly. Stair pans, risers, guards, handrails, returns, and embedded anchors should be installed according to the approved package, with deviations recorded rather than concealed.
Quality inspection checks the finished stair while access is easy. The factory team can measure the flight, verify continuity, inspect nosings, and photograph connections before transport restraints or adjacent module finishes make the work harder to reach.
Site delivery and set require coordination with the crane plan, foundation pads, slab edges, accessible approach, and module sequencing. Transport may require removable handrails or protected projections, but every removed component needs a controlled reinstall procedure and a final field check.
Compliance sign-off compares the as-built installation with the approved drawings. The owner, AHJ, and facilities team should receive the measurements, photographs, product data, corrections, and final acceptance record.
A classroom trailer rental project illustrates why the access package must be coordinated with delivery and occupancy timing. Whether the building is temporary or permanent, the route and stair documentation should follow the asset through setup, inspection, use, and future relocation.
The video below provides another visual reference for modular delivery planning.
A complete handoff file should identify the approved drawings, installed stair location, field measurements, photographs, product information, open-item resolution, and maintenance contacts. That record helps the facilities team understand what was installed and gives future inspectors a clear baseline.
Pacific Mobile Structures, Inc. provides relocatable and permanent modular buildings, along with site access components such as steps, ramps, and related setup services for education, healthcare, government, and commercial projects. Visit Pacific Mobile Structures, Inc. to discuss a modular building and access strategy that coordinates stairs, accessible routes, delivery, and site installation before fabrication begins.